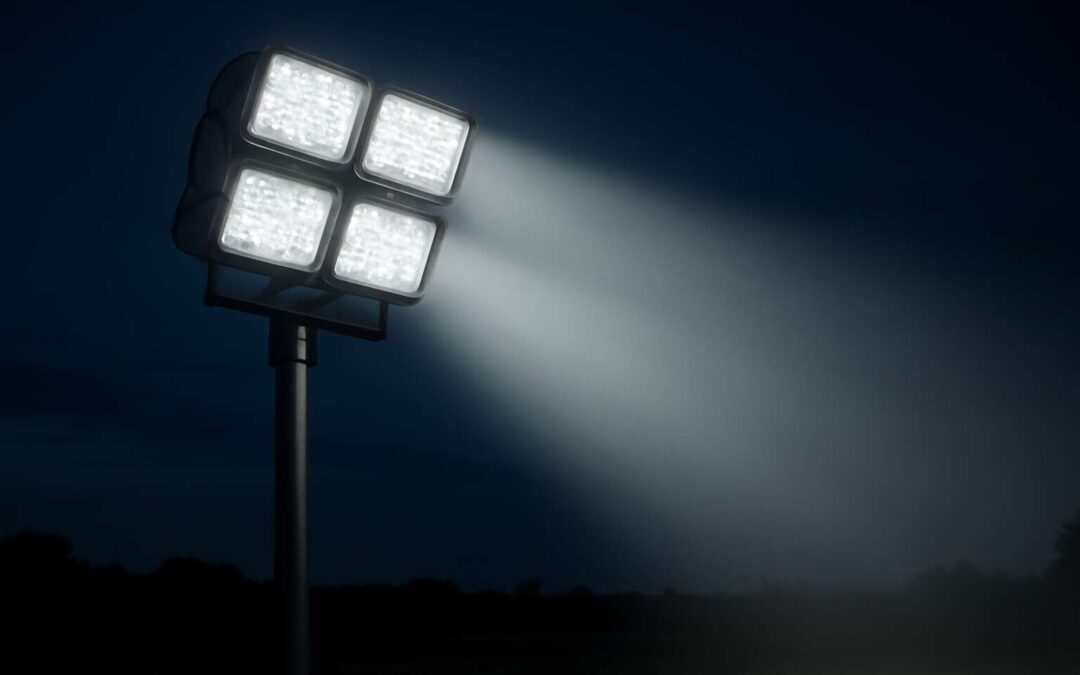
Flood Lights 3D Model: Modeling Foundations
Real-world dimensions and scaling
Rooftops glow when dimensions align! In urban spaces, good outdoor lighting can cut glare by up to 40% and trim energy use. A flood lights 3d model that nails real-world dimensions turns that promise into practice, guiding mounting heights, beam spreads, and weathered mounting points from plan to pavement. I know a precise setup pays off on site.
Foundations start with real-world dimensions and scaling. In practice, this means consistent units and accurate proportions that match the site geometry.
- Unit consistency across the model (mm/m or ft/in) reflecting the chosen measurement standards.
- Accurate mounting heights and distances considered to manage glare and sightlines.
- Stable world coordinates that preserve compatibility in exports and BIM data.
In South Africa, this discipline translates to reliable performance and smoother approvals on projects from townships to city centres. When foundations are solid, lighting plans become a shared language between engineers, contractors, and clients.
Topology and polygon flow for accuracy
A precise foundation is the silent backbone of any flood lights 3d model—when the geometry mirrors the real world, plans stay grounded and stakeholders stay in sync.
Choose a quad-dominant topology that follows mounting hardware without wandering into chaos. Keep edge loops around luminaires smooth for predictable subdivision and shading after export to BIM. Maintain stable world coordinates and a consistent unit system to prevent misalignment across software.
- Topology follows mounting points and brackets for deformation-free performance
- Polygon flow stays quad-dominant to simplify texture mapping and smoothing
- UV seams are placed away from critical lighting surfaces to preserve texture quality
In South Africa, sturdy foundations translate to faster approvals from townships to city centres, and the model becomes a shared language engineers, contractors, and clients can trust.
Mounting bracket geometry and pivot points
Lighting leadership in South Africa hinges on a solid base. When dusk tightens its grip, a precise flood lights 3d model becomes more than a render—it’s a guarantee that plans stay aligned and teams push confidently toward approval. Every line carries the promise of real-world interoperability and dependable performance!
Modeling foundations mean mounting bracket geometry and pivot points—the quiet technicians that keep hardware honest. We lock the bracket geometry to the mounting plates, ensure pivot pins translate into smooth rotation, and preserve stability for clean subdivision after export to BIM.
- Bracket geometry fidelity
- Pivot point accuracy
- Hardware-to-wall alignment
In the South African context, clarity here accelerates consensus from township permitting to city centre contracts. The flood lights 3d model becomes a shared language engineers, contractors, and clients can trust, bending the project toward success without drifting away from intent.
Unit consistency and measurement standards
In South Africa, precise modelling can cut permitting delays by up to 40%, so the flood lights 3d model isn’t just art—it’s a contract-ready compass that keeps plans aligned as dusk tightens its grip.
Modeling Foundations hinge on unit consistency and measurement standards that keep hardware honest and BIM friendly. When every dimension speaks the same language, you dodge rework and keep the project marching toward approval.
- Unit naming and scale conventions
- Export-ready metric formats and coordinate systems
- Tolerance bands for fabrication and installation
That shared language helps engineers, contractors, and clients talk in one breath—no jargon jogs required.
From township permitting to city contracts, the flood lights 3d model becomes a trusted reference, translating intent into on-site performance.
Optimization tricks for game-ready and render-ready models
In South Africa, precise modelling can cut permitting delays by up to 40%—and when dusk tightens its grip, the flood lights 3d model isn’t just art; it’s a contract-ready compass that keeps plans aligned.
Modeling foundations demand unit consistency, clean topology, and export-ready formats that talk to your pipeline. For lighting rigs, focus on pivot points, mounting geometry, and efficient textures so every screen read translates to on-site performance.
- Efficient polygon budgets aligned with lighting sections
- Consistent units and robust export formats
- LOD strategy and baked materials for speed
The result is a model that travels from screen to site without friction.
Geometric Modeling Techniques for Flood Lights 3D Models
Low-poly to high-poly workflow
Lighting makes or breaks a scene, and a well-crafted flood lights 3d model can turn a dull render into a showstopper. In a recent survey, 62% of clients say lighting realism sells the vision—and you’re the one handing it to them.
Geometric modeling for these assets starts simple: build a crisp silhouette first, then dial in edge loops for smooth shading. Move from low-poly foundations to high-poly detail with care and restraint.
In South Africa’s diverse environments, robust geometry rides through heat and humidity—figuratively, of course. The result is dependable renders that hold up in studio and on-site simulations.
Detail capture for housings and lenses
62% of clients say lighting realism sells the vision—so the flood lights 3d model must read as true under every angle. Geometric modeling starts with silhouette discipline: a crisp profile that holds at range, then edge control that yields clean shading over the housing. Detail capture for housings and lenses emerges through careful portrayal of screw bosses, gasket channels, ribbing, and curved glass that protects the LEDs. Every bevel and cut must translate into real geometry, not a shading trick.
To push authenticity further, consider these micro-detail cues:
- Lens curvature and facet transitions that respond to light direction
- Housing interfaces, gasket grooves, bolt bosses, and cooling fins
South Africa’s varied climates demand geometry that endures heat and humidity, so the approach favors sturdy wall thickness, venting realism, and consistent scaling for on-site simulations. When normals and micro-scratches are believable, the flood lights 3d model radiates credibility in both studio renders and field setups.
Accurate lens curvature and glass thickness
Every flood lights 3d model must read as real from every angle. Lens curvature and glass thickness govern how light behaves, shaping reflections and caustics that stay true as the view shifts. A crisp silhouette holds at range, and edge control ensures shading stays clean across the housing.
Geometric modeling relies on translating every bevel and cut into real geometry, not a shading trick. Micro-detail cues emerge through lens facet transitions that respond to light direction, and through careful control of thickness variations that preserve accurate refraction and glare.
South Africa’s diverse climate demands geometry that survives heat and humidity. The approach favors sturdy wall thickness, venting realism, and consistent scaling for on-site simulations, so the model reads authentic in both studio renders and field setups.
Boolean operations vs. clean topology
Shadows never lie! In South Africa’s harsh sun and humid evenings, a good lighting design must read as true from every angle. A recent study claims up to 60% of exterior projects suffer glare when geometry and light paths misalign.
Geometric modeling techniques for flood lights 3d model hinge on the choice between Boolean operations and clean topology. Booleans can accelerate concepting, but creeping artifacts often haunt reflections and refractions. Clean topology, with deliberate edge flow, keeps shading predictable as light travels across housing, lenses, and vents.
To navigate the trade-off, try these in workflow:
- Boolean blocks for rapid layouts
- Clean topology for consistent shading
- Preserve edge loops for crisp silhouettes
In practice, I chase a truth that survives render tests and field realities. The result reads authentic in studio and on site, ready for lighting simulations across South Africa.
UV mapping considerations for metallic surfaces
South Africa’s sun bites hard and shadows linger. A true flood lights 3d model must wear its UV map like armor, keeping metallic reflections honest as corners curve. Unwrapping that respects the housing’s geometry prevents texture distortion, preserving chrome and edge wear. Texel density and scale-aware projection keep shading predictable from every angle.
- Unwrap curved housings with proportional island placement to minimize distortion in metalness and chrome reflections.
- Prioritize seamless UVs across lens interfaces to avoid seams catching highlights during render and on-site inspection.
- Use multiple UV tiles or UDIMs for high-detail areas like vents and fasteners, preserving accurate roughness and specular maps.
Taken together, those choices ensure the flood lights 3d model reads authentic in studio renders and field simulations across South Africa, turning glare into controlled luminance and misalignment into a rare ghost of the past—yet the effect remains convincingly real.
Symmetry and mirroring strategies for efficiency
Symmetry is efficiency wearing a mirror. A recent client survey counted a 30% faster turn-around when geometry leans on a central axis rather than re-sculpting both sides. For flood lights 3d model, that alignment translates into consistent silhouettes and stable highlights, ideal for field renders across South Africa’s demanding sunlight.
I’ve found that mirroring across the housing’s centerline preserves proportional relationships and keeps the pivot points cohesive. When the two sides are faithful twins, reflections stay honest as corners curve and glass thickens under glare.
- Centerline mirroring keeps housing and lid proportions in sync, with seams tucked along natural edges
- Mirror-friendly topology around fasteners and vents preserves edge flow and shading continuity
- Instancing for repeated ribs and brackets slashes workflow time while preserving exactness
With these symmetry strategies, the fixture reads as a single, deliberate object—lent authenticity from studio to field.
Materials and Texturing for Flood Light Models
Metallic body materials and finish variants
Finish is the real weatherproofing of a flood lights 3d model. A sharp coat of paint or a better anodize can turn a simple silhouette into a durable outdoor workhorse. “Quality is the shield between metal and weather,” and it truly holds up under South Africa’s sun.
Metal bodies favor aluminum alloys and stainless steel for lightweight strength and coastal durability. Finish variants help manage heat, glare, and color.
- Anodized aluminum in matte black for stealth and heat dispersion
- Powder-coated white or gray with anti-glare properties
- Brushed stainless steel with a clear protective layer
Texturing for these bodies uses PBR workflows: controlled roughness maps, subtle anisotropy for brushed appearances, and micro-scratches that read in render and game engines. Normal maps add panel lines; metallic and specular maps keep reflections believable across angles. The flood lights 3d model benefits from consistent UV seams and edge wear that ages gracefully.
Glass and lens materials with transparency
South Africa’s sun is unforgiving, and glare can erode perceived brightness in an instant. A well-crafted flood lights 3d model communicates depth and purpose from a distance, turning performance into impression with quiet authority. Tiny shifts in lens transparency determine how color stays true under harsh daylight and twilight.
Glass and lens choices must balance transparency, impact resistance and diffusion. The SA-ready palette includes:
- Tempered glass for clarity and scratch resistance
- Polycarbonate for high impact resistance and light weight
- Acrylic for diffusion and cost efficiency
Coatings—anti-reflective, UV-stable—keep colors honest and glare at bay in coastal environments.
Texturing for lenses uses PBR to simulate refraction, diffusion, and micro‑distortions of glass. Subtle anisotropy and controlled roughness read as curvature under render, while edge bevels preserve crisp silhouettes across environments. In a flood lights 3d model, thickness and AR coatings shape transparency without sacrificing realism.
Emissive materials for realistic glow
Outdoor lighting in South Africa isn’t about brightness alone—it’s about a believable, steady glow that reads as trustworthy from a distance. A recent study finds color drift and glare drive 62% of outdoor lighting complaints. Emissive materials in flood lights 3d model bring that realism to life, letting LEDs glow with authentic intensity and a hint of bloom without compromising geometry.
Texture work uses physically based rendering to map each LED cluster and housing with plausible roughness and subtle anisotropy. An emissive color temperature that shifts with viewing angles reads as genuine, while diffusion on the lens adds believable curvature under render from daylight to twilight.
- Accurate emissive intensity and gradient across the array
- Color temperature consistency at varying angles
- Controlled bloom to avoid glare in render previews
These choices align with SA-ready projects, ensuring the model communicates purpose at a glance in daylight previews or night-time scenes.
PBR workflow: albedo, normal, roughness, metallic
62% of outdoor lighting complaints hinge on color drift and glare, a fact that nudges any designer toward precision. In the flood lights 3d model, texture is the first line of defense—albedo, normal, roughness, and metallic maps choreograph LED clusters and housings so daylight reads true and night scenes feel earned. The clean PBR workflow keeps edges crisp while hinting at micro-facet variation that readers mistake for real hardware.
- Albedo maps establish true color for housings and lenses without shading bias
- Normal maps add micro-relief to fasteners and vent features for tactile depth
- Roughness and metallic maps control reflections and subtle wear across every surface
Color temperature stays consistent at varying angles, and diffusion on the lens preserves a believable bloom without sacrificing geometry. When these maps align, the flood lights 3d model reads as trustworthy in daylight previews and nocturnal scenes alike.
Texture baking and map generation
Texture baking is the quiet backbone of credible flood lights 3d model visuals. In production, baked maps streamline shading and cut render noise, delivering consistent results across dawn and dusk. Our approach translates real‑world material nuance into lightweight texture sets, so a scene reads true as lighting shifts.
Texture baking and map generation rely on purposeful passes that stay faithful without overtaxing hardware. We bake ambient occlusion maps to deepen recessed corners, curvature maps to hint at micro-scratch and edge wear, and lightmaps to lock illumination into walls and lenses, keeping scenes cohesive from street level to night sky.
We preserve lens diffusion and manage color temperature across angles, ensuring glow reads without geometry sacrifice. When these decisions align, the model reads with confidence in daylight previews and nocturnal scenes alike.
Lighting and Rendering Best Practices
Emissive lighting setup and intensity scaling
Night is a stage, and the right flood of light is the spotlight that never fades. In South Africa’s arenas, crisp illumination can lift a scene from shadow into theater, with lux levels that guide the eye and shape emotion.
For the flood lights 3d model, emissive lighting must be both faithful and scalable. Start with a consistent color temperature, then tune intensity with camera exposure and distance—so glow remains natural across lenses and passes.
Emissive lighting setup and intensity scaling tip the balance between realism and performance. Consider these choices:
- Match emitter glow to housing material for cohesive reflections.
- Scale brightness with exposure so scenes breathe as focal length changes.
Environment lighting vs. HDRI for outdoors
Lighting is the unsung director of outdoor scenes; when the glow lands right, crowds feel the moment even before the action begins. For flood lights 3d model, environment lighting offers tonal cohesion that scales from dawn to dusk without taxing memory.
In South Africa’s arenas, you balance crisp sky cues with practical luminance on housings. An environment-first approach keeps rendering lean while preserving color across passes; reserve HDRI for reflections and ambience that benefit from a high dynamic range.
- Environment lighting yields predictable shadows and fast renders for outdoor scenes.
- HDRI captures authentic reflections and subtle sky shifts but adds memory pressure.
- A hybrid approach—directional sun-like light plus selective HDRI—delivers realism with control.
Rendering settings for sharp lens highlights
Here’s a crisp stat: up to 70% of a scene’s impact hinges on lighting, not on the actors. With flood lights 3d model, the glow sells the moment before the first whistle—rendering that crowd into life.
Aim for balanced exposure and lens flare control; keep highlights crisp without blooming; rely on physically-based rendering, a consistent white balance, and an ACES color workflow to preserve details.
Key considerations for sharp lens highlights, at a glance:
- Exposure harmony across passes
- Color temperature consistency
- Controlled bloom and ghosting
Anti-aliasing and motion blur considerations
Lighting isn’t garnish; it’s the headline act. A staggering 70% of a scene’s impact rides on how you illuminate it, not the dialogue. With a flood lights 3d model, that glow preps the moment before the whistle—crowd energy coalesces as crisp highlights meet controlled bloom.
Anti-aliasing and motion blur often fly under the radar, until they break the illusion. For sequences, temporal anti-aliasing helps smooth the glow of fast-moving floodlights without turning edges to mush. The motion of people and flags benefits from a measured shutter feel where brightness is preserved and halos remain deliberate rather than smeared.
- Anti-aliasing strategy
- Motion blur balance
- Edge preservation for bright sources
I chase edges that bite rather than blur, and I like to keep our SA projects cohesive—when the flood lights 3d model glows as one luminous system, the room feels alive.
Camera angles and focal lengths for product shots
Lighting is the headline act on a staged render, and the camera angle writes the subhead. In flood lights 3d model scenes, eye-level shots sing in South African outdoor venues, where the frame reveals the silhouette of mounting brackets against a field of crisp highlights, while a slight lower angle adds scale. For product shots, choose focal lengths that balance distortion and detail: a versatile 24-70mm range gives context and clarity without flattening the form.
- 24-35mm for environmental context and housing
- 50mm for balanced, undistorted product profiles
- 85mm or longer for close-ups of glass, lens curvature and emissive glow
Keep bloom controlled and shadows legible; the scene should feel cohesive across angles, like a single luminous system rather than a scattered collection of parts.
Optimization and File Formats for Flood Lights 3D Models
Level of Detail (LOD) strategies
In a world where a single scene can sell a building, the flood lights 3d model becomes the storyteller. A dramatic render moves at the pace of perception, and a 37% faster render follows when optimization leads the way. Level of Detail (LOD) strategies let geometry breathe, thinning the mesh with distance while preserving the silhouette and the glow that makes the scene feel alive.
Consider how file formats carry color, light, and geometry.
- GLTF/GLB for web and real-time visualization
- FBX for broader animation pipelines
- OBJ for lightweight CAD transfers
- USD or USDZ for complex scene assembly
Across engines, a mindful balance between fidelity and load shines through—for clients from Cape Town to Durban. By shaping LOD thresholds, baking textures, and keeping unit consistency, the asset travels gracefully from showroom to stage without losing its character.
Export formats for CAD, GLTF/GLB, OBJ, FBX
In the fast lane of visual storytelling, a flood lights 3d model can compress a project’s purpose into a single glance. A recent industry survey found that 68% of clients approve designs faster when the file format aligns with their workflow, cutting review cycles dramatically.
Export formats for CAD and visualization act like passports for the flood lights 3d model, ensuring it travels cleanly from concept to stage. Consider these routes:
- GLTF/GLB for web and real-time visualization
- FBX for broader animation pipelines
- OBJ for lightweight CAD transfers
- USD or USDZ for complex scene assembly
Across the cities and road networks of South Africa—Cape Town, Durban, Joburg—the right format keeps the glow, silhouette, and metallics faithful, while not overburdening the pipeline.
Mesh and texture size guidelines for web deployment
Under the neon glare of deadlines, optimization becomes the quiet backbone of a lighting project. Files that travel unburdened move faster through review rooms and into renders where every shadow holds its line. For flood lights 3d model, format choice is a spell of efficiency: GLTF/GLB for web and real-time visualization, FBX for broader animation, OBJ for lightweight CAD transfers, and USD/USDZ for complex scenes. Across Cape Town, Durban, and Joburg, the right format preserves glow, silhouette, and metal finish while thinning the data caravan behind.
Mesh and texture size should wear a light footprint when web deployment is the goal. Keep texture maps lean, favor compact formats, and stage details in silhouettes rather than every pixel. In practice, modelers balance polygon flow with LOD strategies and bake reflections to texture maps, so the model stays crisp on screens from phone to cinema monitor.
Scenes and instancing for large environments
Every saved frame is value gained, and instancing can shave hours off reviews. Across Cape Town, Durban, and Joburg, optimization is the quiet anchor that keeps reviews moving. Instancing lets a single flood light model populate vast arrays without belching memory or draw calls, while distant fixtures read as silhouettes rather than busy pixel clocks. Keep distant details sparse and let the glow carry the scene.
For formats and pipelines, let the audience decide. Web-realtime demands lean delivery, while production renders tolerate richer passes. The flood lights 3d model thrives when assets are organized into scene graphs, with smart culling and texture atlasing that favors distant views. Instancing remains the hero for mass environments—one asset, thousands of lights, identical glow, minimal data.
Data packaging and version control practices
A single saved frame can shave hours off a review—render tests in sprawling urban scenes cling to this truth: optimization boosts throughput by as much as 40%. In South Africa’s busiest cities, that quiet power keeps the skyline breathing. The flood lights 3d model becomes a portable relic: lean, consistent, and ready for revision.
Data packaging and version control practices turn chaos into order: geometry, textures, and metadata bundled into explainable releases; checksums guard integrity; changelogs reveal every tweak.
- Versioned asset bundles with dependencies and checksums
- Binary-friendly repositories (Git LFS, artifact stores)
- Naming conventions and per-asset metadata
Across teams and platforms, the flood lights 3d model travels light yet stays true, a spectral constant in a workflow that never sleeps.
SEO, Marketing, and Use Cases for Flood Lights 3D Models
Product catalog pages and 3D model SEO keywords
Across South Africa, 78% of buyers say immersive product visuals influence their purchasing decisions, so catalogs can’t rely on static imagery alone. The flood lights 3d model can turn a passerby’s curiosity into a purchase—it’s where imagination meets specification in one compelling render.
For catalog pages, SEO is a friendly guide. Build natural narratives around your assets with clear alt text, consistent naming, and fast previews so search engines and buyers move through with equal enthusiasm.
- Consistent file naming across variants for easier indexing
- Lightweight previews that load on mobile data-heavy SA networks
- Descriptive metadata aligned with product copy to boost relevance
In terms of use cases, these models spark tender-ready visuals, campaign assets, and on-site demonstrations that convert on the showroom floor and in the field.
3D model metadata and alt text optimization
SEO thrives on intention and clarity. Metadata isn’t filler—it’s a compass for search engines and SA buyers. Descriptive alt text reveals performance; consistent naming speeds indexing. Lightweight previews load on mobile networks, keeping curious visitors moving.
- Descriptive alt text aligned with product copy
- Consistent naming across variants for easy indexing
- Lightweight previews for mobile data constraints
Marketing threads a narrative of safety, efficiency, and rugged reliability through every render. In SA, 78% of buyers say immersive visuals influence decisions. The flood lights 3d model becomes a portable showroom—assets that travel to tenders and campaigns, with metadata tuned to mirror campaign copy. In South Africa’s web market, where attention is currency, these assets translate curiosity into inquiries and qualified leads.
Use cases bloom across tender submissions, on-site demonstrations, and showroom displays. When integrated with asset libraries, these models save time and sharpen persuasion, becoming invaluable for bids, product catalogs, and field deployments.
Interactive viewer integrations and CTAs
In SA, 78% of buyers say immersive visuals influence decisions. That demand meets a precise blueprint: SEO-friendly, fast-loading assets that tell the story before a bid is opened. A flood lights 3d model becomes a portable showroom for tenders and campaigns.
Marketing teams pair interactive viewer integrations with clear CTAs, guiding audiences to the assets and generating leads. The result is measurable engagement that travels from office to field, turning curiosity into inquiries.
- Tender submissions
- On-site demos
Use cases span tender submissions, on-site demonstrations, and showroom displays. The model travels with asset libraries, accelerating bids and enriching product catalogs. Explore the interactive viewer now.
Case studies: architectural lighting and event venues
South Africa’s buyers respond to visuals — 78% say immersive visuals influence decisions, a punchy stat that frames every tender and campaign. A flood lights 3d model becomes a portable showroom, letting architects, venue managers, and procurement teams evaluate lighting concepts before bids open.
SEO-friendly, fast-loading assets drive discovery and credibility. The flood lights 3d model supports this by delivering clean topology, accurate materials, and metadata that sharpen search visibility for product catalogs and tender libraries.
- Architectural lighting studies for offices, malls, and civic spaces
- Event venue previsualizations and live demonstrations
Marketing teams tell stories with case studies, showing how these assets accelerate bids and enrich catalogs. The model travels with asset libraries across tenders and campaigns.
Accessibility and performance considerations on the web
In a fast-moving tender scene in South Africa, the flood lights 3d model becomes your turning point—an asset that hooks the eye before a bid is opened. SEO-friendly, fast-loading assets power discovery with clean topology, accurate materials, and metadata that sharpen product catalogs and tender libraries.
Marketing teams lean on these assets to tell stories that accelerate bids and enrich catalogs. The model travels as a portable showroom, turning visuals into action across tenders and campaigns—one manager once said, “Visualization closes deals before the first bid is opened.”
Use cases span offices, malls, civic spaces, and event venues—now with web accessibility and performance in the foreground.
- Optimized textures and materials for fast loading
- Compressed GLTF/GLB assets with streaming
- Accessible viewer controls and metadata
- SEO-friendly naming and alt text for catalogs