Preparation and Planning for Flood Light Installation
Assessing Your Lighting Needs – Determine the areas that require flood lighting and the purpose (security, landscaping, etc.)
When contemplating how to install flood lights, the first step is to understand exactly what you need these lights to accomplish. In rural South Africa, outdoor lighting can transform a dark, unwelcoming space into a safe sanctuary or a vibrant gathering spot. Assessing your lighting needs isn’t just about brightness; it’s about creating a atmosphere that feels both secure and inviting.
Think about the specific areas that require illumination—driveways, pathways, or perhaps a farm shed. Clarify whether the flood lights are intended primarily for security, to ward off unwelcome visitors, or for aesthetic purposes like highlighting a sprawling jacaranda or a rustic water fountain. Proper planning involves identifying these zones to ensure your flood lights are both functional and energy-efficient.
- Identify the key areas that need lighting.
- Determine the purpose—security, landscape enhancement, or both.
- Measure the distances to select the appropriate flood light type and wattage.
By taking these thoughtful steps, you set a sturdy foundation for learning how to install flood lights effectively, ensuring they serve their purpose beautifully and reliably for years to come. After all, good lighting isn’t just about visibility—it’s about creating a sense of safety and comfort in your outdoor space.
Choosing the Right Flood Lights – Types, brightness, wattage, and features to consider
Preparation and planning are the vital steps that transform a simple outdoor lighting project into a seamless experience. When considering how to install flood lights, selecting the perfect fixtures is paramount. The landscape of flood lighting is vast, with an array of types, brightness levels, wattages, and features tailored to different needs. Envision floodlights that cast a gentle glow over a sprawling garden or powerful beams that safeguard your farmstead—each choice influences the ambiance and security of your space.
Choosing the right flood lights involves understanding your specific environment. For example, high-wattage options are ideal for expansive areas needing intense illumination, while softer, lower-wattage fixtures suit more delicate landscaping features. Features like motion sensors, adjustable heads, and weatherproof casings should also be considered to ensure longevity and functionality.
When selecting floodlights, consider the following:
- The type of flood light—LED, halogen, or solar-powered.
- The brightness, measured in lumens, to match your lighting needs.
- The wattage, which impacts energy consumption and brightness.
- Additional features such as motion detection, adjustable angles, and durability against South Africa’s diverse climate.
With these factors in mind, you can confidently navigate the process of how to install flood lights, ensuring they illuminate your space in both beauty and security.
Checking Local Codes and Regulations – Ensure compliance with electrical codes and obtain necessary permits
Embarking on the journey of how to install flood lights demands more than mere technical know-how; it requires a respect for the intricate tapestry of regulations that safeguard our homes and communities. In South Africa, the landscape of electrical codes is as diverse as its vistas, and compliance is not just a legal obligation but a cornerstone of safety and longevity.
Before any installation begins, it is essential to check local codes and regulations. This step ensures your project aligns with national standards and community guidelines, preventing costly setbacks. Securing the necessary permits is a vital part of this preparation, acting as a safeguard against future disputes or safety hazards.
In some regions, this might involve submitting detailed plans to municipal authorities or adhering to specific wiring standards. Remember, neglecting these steps can lead to complications, but thorough planning transforms a straightforward task into an elegant expression of responsible craftsmanship. When you understand and respect these regulations, your outdoor lighting becomes a seamless extension of your property’s beauty and security.
Gathering Necessary Tools and Materials – List of tools (drill, ladder, wire strippers), electrical supplies, and safety equipment
Before embarking on your journey to learn how to install flood lights, a crucial step is thorough preparation and planning. This phase transforms a potentially hazardous task into a seamless process, ensuring safety and efficiency every step of the way. Gathering the right tools and materials is the foundation of a successful installation, preventing frustrating delays and mishaps.
Essential tools include a sturdy drill, a reliable ladder, and wire strippers. These will help you access hard-to-reach places and make clean, precise connections. Don’t forget safety equipment—gloves, safety glasses, and insulated tools are vital for protecting yourself from electrical hazards. Additionally, having the correct electrical supplies, such as weatherproof wiring, connectors, and mounting brackets, is key to ensuring your flood lights operate reliably and safely.
Now, let’s consider the importance of a detailed plan. Create a layout that defines the placement of your flood lights, considering elements like shadows, glare, and security needs. An organized approach minimizes surprises, making the entire process more manageable. When you know exactly what tools and materials you need, you’re well on your way to understanding how to install flood lights that last and perform flawlessly.
Safety Considerations Before Installation
Turning Off Power – Switch off relevant circuits from the breaker box
Before embarking on the journey of how to install flood lights, one critical step often overlooked is turning off the power. Electrical mishaps are not just inconvenient—they can be perilous, risking serious injury or damage. A moment of diligence in switching off relevant circuits from the breaker box is your first line of defense, creating a safe sanctuary within which to work. This act not only prevents accidental electrocution but also ensures that your work proceeds without the threat of an unexpected electrical surge.
Once the power is safely cut, it’s wise to double-check that no residual electricity remains in the wires. Using a voltage tester can provide definitive peace of mind, confirming that the circuit is truly dead. Remember, the safety of your workspace hinges on meticulous attention to these preliminary steps. Only then can you confidently move forward in how to install flood lights, knowing that safety remains uncompromised in every phase of the project.
Using Safety Gear – Gloves, goggles, and non-slip footwear
Before you dive into the technicalities of how to install flood lights, safety must remain your top priority. Even a small oversight can lead to injuries or electrical hazards that are hard to reverse. When handling electrical components outdoors, protective safety gear is not optional—it’s essential. Wearing sturdy gloves shields your skin from sharp edges and accidental sparks, while goggles protect your eyes from debris or unexpected sparks. Non-slip footwear offers stability on uneven or wet surfaces, reducing the risk of falls or mishaps during installation.
Remember, safety gear acts as your first line of defense against unforeseen complications. It’s a small investment for peace of mind and a successful project. When working at heights with a ladder, ensure it’s stable, and keep your hands free to maintain balance. Being cautious now can save you from costly repairs or injuries later, especially when discovering how to install flood lights in outdoor environments that demand extra vigilance. Your safety is the foundation for a flawless installation process—don’t compromise it!
Verifying Power is Off – Using a voltage tester to confirm circuit is de-energized
Before you even think about how to install flood lights, safety is the name of the game. Nothing ruins a good installation faster than a jolt from a stray wire or a trip on a slippery surface. The first step? verifying that the power is truly off. A moment’s oversight here can turn your DIY project into a high-voltage disaster.
Grab a reliable voltage tester—an essential tool in your safety arsenal. Touch it to the circuit you plan to work on; if it lights up or beeps, don’t proceed. It’s tempting to assume the switch is off, but electrical currents are slippery little devils and can lurk even when the breaker is switched off. Confirming the circuit is de-energized is the safest way to prevent shock hazards.
- Always double-check with a voltage tester before handling any wires.
- Keep your hands dry and wear insulated gloves for added protection.
This small precaution ensures your project stays on the right side of safe, especially when working outdoors where weather and environment add extra layers of complexity. Remember, when it comes to how to install flood lights, verifying power is off isn’t just good advice — it’s your ticket to a safe and successful installation.
Step-by-Step Guide to Installing Flood Lights
Locating the Perfect Mounting Spot – Optimal height, visibility, and avoiding obstructions
When it comes to illuminating your outdoor space effectively, understanding how to install flood lights begins with identifying the perfect mounting spot. The right placement not only enhances visibility but also ensures safety and efficiency. Opt for a location that provides an unobstructed view of the area you wish to light, avoiding branches, eaves, or other obstacles that could cast unwanted shadows or block the light’s reach.
Finding the ideal height is crucial—too high, and the light may lose its intensity; too low, and it might create uneven illumination. Generally, mounting flood lights at a height of 2.5 to 3 meters strikes a balance between coverage and brightness. This height allows the light to spread evenly across your yard or driveway, while also making it difficult for intruders to tamper with the fixture.
To simplify your installation process, consider following these steps in order:
- Identify a sturdy, secure mounting surface such as a wall or eave.
- Ensure the spot offers maximum visibility for the intended area.
- Check for potential obstructions that could hinder the flood light’s effectiveness.
By carefully selecting your flood light mounting spot, you’ll set a solid foundation for a successful installation, illuminating your outdoor haven with confidence and clarity. Knowing how to install flood lights properly not only safeguards your property but also elevates your home’s aesthetic appeal—making every night a little brighter and safer.
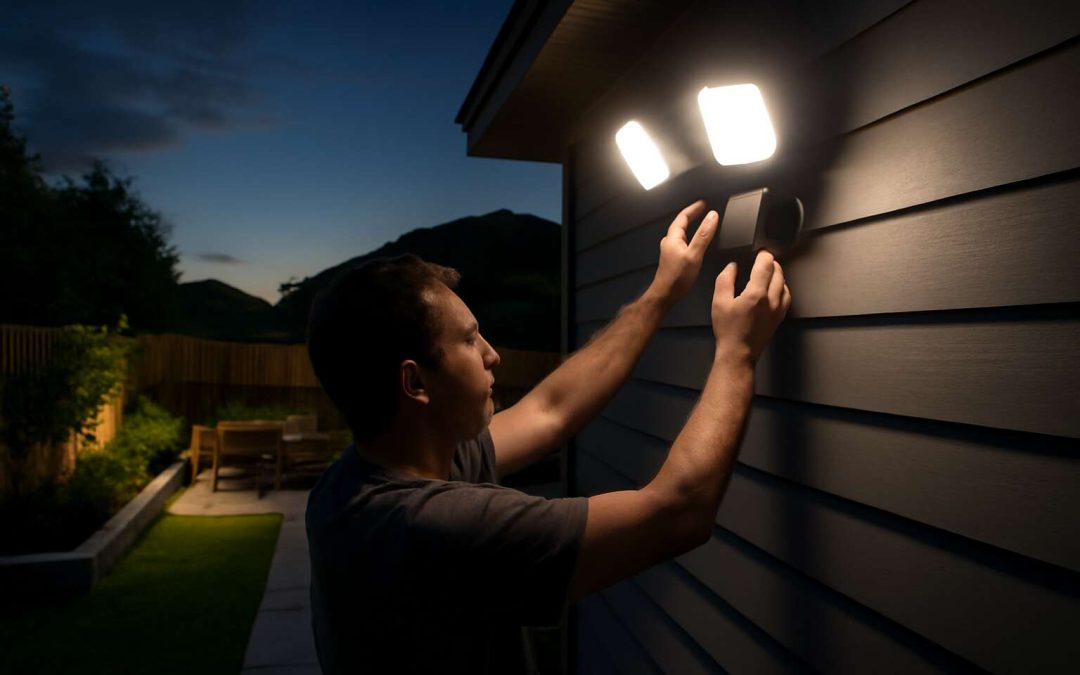
Installing Mounting Brackets – Using anchors and screws for secure attachment
Installing flood lights may seem straightforward, but securing the mounting brackets correctly is crucial for safety and performance. Proper attachment prevents the fixture from becoming loose or falling, which can pose hazards or reduce illumination. Start by selecting a sturdy surface—such as a wall or eave—that can support the weight and withstand weather conditions.
Next, consider the type of anchors suitable for your mounting surface. For concrete or brick, use masonry anchors; for wooden structures, heavy-duty screws will suffice. Insert the anchors into pre-drilled holes, then align the flood light’s mounting bracket with these points. Use a drill to tighten the screws securely, ensuring the fixture is firmly attached and level. This step is essential in the process of how to install flood lights, as it provides the foundation for effective lighting.
Remember, a well-secured flood light not only optimizes brightness and coverage but also extends its lifespan. When mounting, double-check that the fixture is stable, and avoid overtightening, which could damage the bracket. Once installed, you’ll have a reliable outdoor lighting setup that promotes safety and enhances your property’s aesthetic appeal!
Wiring the Flood Lights – Connecting wires correctly (hot, neutral, ground)
Wiring flood lights correctly is the heartbeat of a successful outdoor installation, transforming a simple fixture into a beacon of safety and elegance. The process demands a delicate balance of precision and patience, as each wire bears the potential to illuminate or shadow your efforts. When learning how to install flood lights, connecting the hot, neutral, and ground wires accurately is paramount to ensure both safety and optimal performance.
Begin by identifying the wires from your flood light fixture—typically, the black or red wire is hot, the white wire is neutral, and the green or bare wire serves as ground. Carefully strip the ends of each wire using wire strippers, exposing enough copper to make a secure connection. Next, match each wire to its corresponding circuit wire—hot to hot, neutral to neutral, and ground to ground. Secure them firmly with wire connectors, making sure there are no loose strands that could cause shorts or sparks.
For added safety, consider using a voltage tester after wiring to verify that no current is flowing through the circuit. Once confident, gently tuck the wires into the junction box, avoiding pinching or damage, and attach the flood light securely to its mounting bracket. When wiring flood lights, precision is essential—each connection not only determines the fixture’s brightness and coverage but also preserves your peace of mind during nightfall.
Remember, your outdoor lighting setup is only as reliable as the wiring behind it. Properly wired flood lights will shine brightly across your property, emphasizing beauty and safety in equal measure. In this intricate dance of electricity and craftsmanship, understanding how to install flood lights with care and accuracy ensures your outdoor space remains a sanctuary of light and tranquility.
Securely Attaching the Flood Light Fixture – Ensuring stable and waterproof mounting
Securing the floodlight to its mounting point is a delicate dance between stability and resilience against the elements. As darkness creeps across the landscape, a sturdy fixture becomes a silent guardian, warding off shadows and unseen threats. Attaching the flood light fixture with precision ensures it withstands the gusts and rains that test its resolve. Begin by aligning the fixture’s mounting bracket with your pre-drilled holes, ensuring it sits level and true. Use quality anchors and corrosion-resistant screws—these tiny guardians prevent the fixture from succumbing to the relentless march of time and weather.
Once the fixture is loosely fastened, verify its stability by gently tugging. A wobble here invites future peril—tighten where necessary, but avoid over-tightening, which might crack the housing or misalign the beam. To achieve a waterproof seal, apply a bead of weatherproof silicone around the mounting bracket’s edges before final attachment. This invisible barrier guards against moisture infiltration, which could turn your luminous sentinel into a silent, rusting monument in the shadows.
In the shadows of twilight, when the last light fades, a well-mounted flood light stands as a beacon of safety and clarity—its secure attachment is the silent promise of illumination that endures through storms and darkness alike.
Connecting to Power Source – Hardwired vs. plug-in options, using proper connectors
Connecting your flood lights to a power source is the final step in illuminating your outdoor space. Whether you opt for a hardwired setup or prefer the convenience of a plug-in flood light, understanding the process is essential for safety and durability.
Hardwired flood lights require connecting directly to your home’s electrical system. This involves running a cable from your circuit breaker to the fixture, ensuring proper insulation and secure connections using wire connectors designed for outdoor use. On the other hand, plug-in flood lights offer a simpler alternative—just plug the fixture into an outdoor-rated extension cord or socket, making them ideal for DIY enthusiasts or temporary installations.
When wiring your flood lights, always verify the correct connection of hot, neutral, and ground wires. Using the right connectors—such as waterproof wire nuts—can prevent moisture intrusion and electrical faults. Remember, safety is paramount: turn off the power at the breaker box and use a voltage tester to confirm the circuit is de-energized before proceeding. This ensures you are working in a secure environment, reducing the risk of electrical shock.
By understanding how to install flood lights properly, you can enjoy reliable illumination that withstands South Africa’s diverse climate. Whether hardwired or plug-in, the key is secure, weatherproof connections that stand the test of time.
Testing and Adjusting Your Flood Lights
Restoring Power – Turn the circuit back on at the breaker
Once your flood lights are wired up and mounted, it’s time for the moment of truth—testing and adjusting. Flick the circuit breaker back on and prepare for a little illumination magic. If everything is wired correctly, your new flood lights should spring to life with a satisfying glow. But if they don’t, don’t panic; troubleshooting is part of the fun!
Start by observing the light’s coverage. Are the beams hitting the intended area? If not, consider adjusting the angle or height of the flood lights for optimal illumination. Sometimes, a simple tilt can dramatically improve visibility and security. For larger setups, it’s helpful to mark the preferred position before tightening everything fully. Remember, a well-adjusted flood light not only keeps your property safe but also conserves energy by avoiding unnecessary glare.
Restoring power is the final step, and it’s best to do this cautiously. Once you switch the circuit back on, double-check all connections and ensure no wires are loose. Proper testing and fine-tuning of your flood lights ensure that your installation is both effective and safe—because nobody wants a dark driveway or a faulty fixture, after all!
Testing the Lights – Check for proper operation and brightness
Once your flood lights are wired and mounted with care, the moment of magic arrives—testing their brilliance and adjusting their gaze. Knowing how to install flood lights correctly ensures your property is illuminated just right, striking a perfect balance between security and aesthetic appeal. When you flip the circuit breaker back on, expect a burst of welcoming light to cascade over your landscape, driveway, or backyard. If the lights don’t shine as expected, don’t fret; troubleshooting is part of the journey towards perfect illumination.
Start by assessing the coverage area. Turn on the flood lights and observe their brightness and direction. Are they illuminating the intended space? If not, consider making minor adjustments to the angle or height—sometimes a simple tilt can cast a dramatic difference. For larger setups, it’s wise to mark the optimal positions before tightening the fixtures permanently, ensuring consistent results every time. Remember, a well-placed flood light enhances security while conserving energy by minimizing unnecessary glare.
Properly testing and adjusting your flood lights is essential to achieve maximum efficiency. Watch for shadows or dark spots and tweak the angle until the illumination is even. For added precision, use a marker or tape to note the best position before final tightening. This careful calibration guarantees your flood lights will serve as vigilant guardians against intruders and brighten your pathways with a warm, inviting glow.
Adjusting the Angle and Coverage – Position the lights for optimal illumination
Getting your flood lights to shine just right can transform your outdoor space. Once wired and mounted, the next step is to test and fine-tune their angle and coverage. Properly adjusting how to install flood lights ensures they illuminate your driveway, garden, or patio evenly, enhancing security and curb appeal. A few small tweaks can make a big difference in brightness and focus.
Start by turning on the power and observing how the flood lights perform. Are they lighting the intended area? If not, gently tilt the fixtures until the light hits the right spot. For larger setups, it helps to mark the optimal position with tape before tightening everything permanently. This way, you guarantee consistent results and avoid unnecessary adjustments later.
Remember, the goal is to eliminate shadows and dark corners. Adjust the angle until the light coverage is even, then secure the fixture firmly. When you know how to install flood lights correctly, the result is a well-lit space that’s both secure and inviting. Precision in this step maximizes energy efficiency and ensures your outdoor lighting remains effective night after night.
Setting Timers or Sensors (if applicable) – Automating the lighting for convenience
Once your flood lights are wired and mounted, testing and adjusting their settings is the final step toward achieving perfect illumination. Automating your outdoor lighting with timers or sensors can elevate convenience, allowing your flood lights to turn on automatically at dusk or when motion is detected. This not only enhances security but also conserves energy—an efficient way to keep your outdoor space welcoming without constant manual intervention.
To ensure your flood lights operate optimally, begin by turning on the power and observing their performance. Are they illuminating the desired areas? If not, gently tilt the fixtures until the light hits the intended spot. For larger setups, it’s helpful to mark the optimal position with masking tape before tightening everything permanently. This approach guarantees consistency and minimizes the need for future adjustments.
Incorporating timers or motion sensors can be seamlessly integrated during the installation process, providing a hands-free lighting experience. When setting these devices, consider the specific needs of your space—whether you want bright security lighting or subtle accent illumination. Properly configured, they maximize energy efficiency and ensure your flood lights remain effective long after installation, illuminating your outdoor space with precision and reliability.
Maintenance and Troubleshooting Tips
Regular Inspection – Check for signs of damage or wear
Regular maintenance of your flood lights isn’t just about keeping things functional; it’s about preserving safety and extending the lifespan of your investment. A thorough inspection can reveal subtle signs of damage or wear—corrosion, loose wiring, or cracked lenses—that might otherwise go unnoticed until they cause a problem. Catching these issues early can save you time and money, especially when considering how to install flood lights that are both durable and effective.
Performing routine checks involves examining the mounting brackets, ensuring that fixtures are securely attached and free from rust or deterioration. Additionally, inspecting the wiring for frayed insulation or corrosion can prevent electrical failures and hazards. Remember, a well-maintained flood light system not only illuminates your property beautifully but also fortifies your security against unwelcome visitors. To streamline the process, consider creating a simple checklist:
- Check for loose or corroded connections
- Inspect the lens for cracks or dirt buildup
- Ensure the fixture is properly aligned and stable
- Test the light’s operation to confirm it turns on seamlessly
By incorporating these troubleshooting tips into your routine, you guarantee that your flood lights remain a reliable feature of your property’s security and aesthetic appeal. Knowing how to install flood lights properly initially is crucial, but consistent maintenance ensures they work optimally for years to come, adapting to changing weather conditions and wear over time.
Cleaning the Fixtures – Removing dirt and debris for optimal performance
Maintaining the luminous integrity of your flood lights is an often-overlooked art—one that can dramatically influence the longevity and efficacy of your lighting system. Dirt, dust, and accumulated debris not only diminish brightness but can also interfere with the delicate electrical components tucked within each fixture. When learning how to install flood lights, understanding the importance of regular cleaning becomes paramount—yet equally vital is the ongoing care that keeps illumination crisp and dependable.
Cleaning fixtures involves a simple yet meticulous process. Using a soft cloth and gentle cleaning solution, carefully wipe away dirt or grime from the lens and housing. For fixtures exposed to the elements, a light rinse with water can remove stubborn dirt and prevent buildup that clouds the light’s beam. Pay special attention to the lens—dirt and debris can obscure the light, reducing its coverage and impact. Remember, a clear lens isn’t just about aesthetics; it’s about optimizing the functional performance of your flood lights.
In addition, inspecting the wiring and connections during cleaning can preempt potential failures. Look for corrosion or loose wiring, which can compromise safety or cause flickering. If any corrosion or damage is detected, addressing it promptly ensures your flood lights remain resilient against South Africa’s diverse weather conditions. Proper maintenance not only sustains the beauty and security your flood lights provide but also deepens your understanding of how to install flood lights that stand the test of time.
Replacing Bulbs or Components – Ensure longevity and consistent lighting
Ensuring your flood lights remain luminous and dependable requires more than just installation; it demands vigilant maintenance and timely troubleshooting. Over time, bulbs can dim or burn out, diminishing the effectiveness of your lighting system. Replacing these components promptly restores brightness and keeps your outdoor space secure and inviting.
When learning how to install flood lights, understanding the nuances of bulb replacement is essential. Carefully disconnect the power, wait for the fixture to cool, and then remove the old bulb—being mindful of fragile filaments. Choose a replacement that matches the wattage and type specified by the manufacturer to ensure optimal performance.
Troubleshooting often involves inspecting wiring connections for corrosion or looseness. A flickering light may signal loose wiring or a failing bulb, while complete darkness could indicate a blown fuse or faulty switch. Regularly checking these elements can prevent minor issues from escalating into costly repairs, making your flood lights a steadfast guardian of your property.
Troubleshooting Common Issues – Solutions for flickering, no power, or poor coverage
Understanding how to install flood lights extends beyond the initial wiring; it delves into the meticulous art of ongoing maintenance and troubleshooting. Even the most robust lighting systems can falter under the weight of time, with flickering bulbs or complete darkness signaling deeper issues. Recognizing these signs early can prevent minor inconveniences from escalating into costly repairs, ensuring your outdoor space remains secure and inviting night after night.
When troubleshooting common issues, start by inspecting wiring connections for corrosion or looseness—these are often the culprits behind flickering or intermittent lighting. A flickering flood light, for instance, may stem from loose wiring or a failing bulb, while total darkness might indicate a blown fuse or faulty switch. To systematically diagnose these problems, follow a simple sequence:
- Verify the power supply using a voltage tester to confirm the circuit is de-energized before handling any wiring.
- Inspect the wiring connections—tighten any loose wires and replace corroded connectors.
- Check the bulb socket for signs of damage or wear, replacing the bulb with one that matches the manufacturer’s specifications.
For coverage issues or uneven illumination, consider repositioning or adjusting the flood lights’ angles. Sometimes, poor coverage results from incorrect installation height or obstructions in the line of sight. Regularly inspecting your flood lights for signs of damage, dirt accumulation, or debris can also enhance their longevity and performance. Remember, the key to mastering how to install flood lights—and keeping them in prime condition—is a blend of vigilant maintenance and a keen eye for detail. After all, a well-maintained flood light isn’t just about illumination; it’s about cultivating a sense of safety and serenity that endures through every season.